
The Unsung Hero: Understanding the 1998 Honda Civic’s Manifold Absolute Pressure Sensor
Related Articles: The Unsung Hero: Understanding the 1998 Honda Civic’s Manifold Absolute Pressure Sensor
Introduction
With enthusiasm, let’s navigate through the intriguing topic related to The Unsung Hero: Understanding the 1998 Honda Civic’s Manifold Absolute Pressure Sensor. Let’s weave interesting information and offer fresh perspectives to the readers.
Table of Content
The Unsung Hero: Understanding the 1998 Honda Civic’s Manifold Absolute Pressure Sensor
The 1998 Honda Civic, a popular and reliable model, relies on a complex system of sensors to ensure optimal engine performance. One such vital component, often overlooked but crucial for efficient combustion and fuel economy, is the Manifold Absolute Pressure (MAP) sensor. This article delves into the workings, importance, and potential issues associated with the MAP sensor in the 1998 Civic.
A Glimpse into the MAP Sensor’s Function:
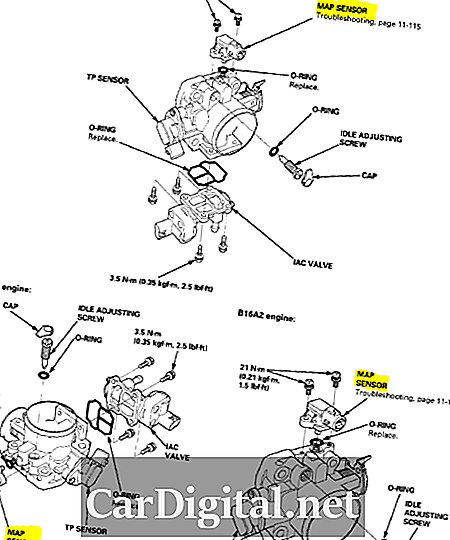
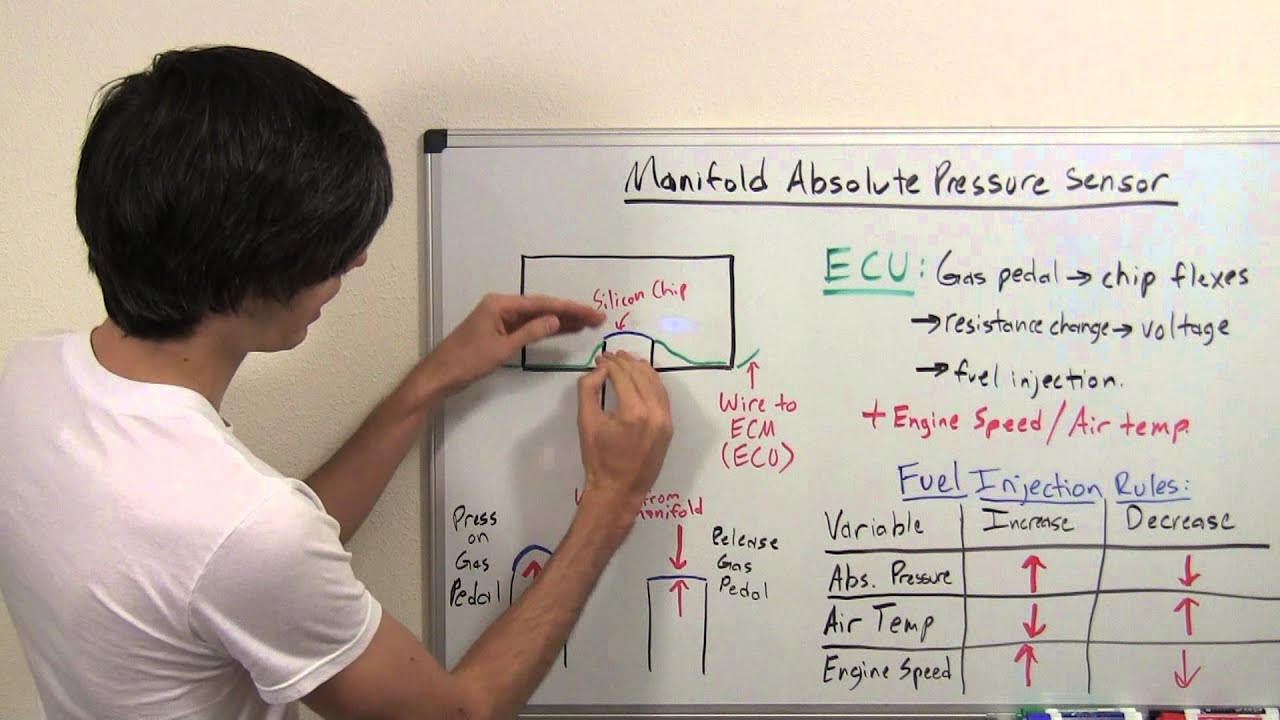
The MAP sensor, typically located on the intake manifold, plays a critical role in determining the amount of air entering the engine’s cylinders. It does so by measuring the absolute pressure inside the intake manifold, which directly correlates to the density of the air entering the engine. This information is then transmitted to the engine control unit (ECU), the brain of the car, which uses it to calculate the optimal amount of fuel to inject for efficient combustion.
Unveiling the Importance of the MAP Sensor:
The MAP sensor’s contribution to engine performance is multifaceted:
- Optimizing Fuel-Air Mixture: By accurately measuring the air density, the MAP sensor enables the ECU to precisely adjust the fuel injection system, ensuring the ideal fuel-air mixture for optimal combustion. This leads to improved fuel economy and reduced emissions.
- Enhancing Engine Performance: A properly functioning MAP sensor ensures smooth engine operation, providing the correct fuel-air ratio across varying engine speeds and loads. This results in a more responsive and powerful engine.
- Preventing Engine Damage: An inaccurate MAP sensor reading can lead to a rich or lean fuel mixture, potentially causing engine damage due to misfires, knocking, or even stalling.
Common Symptoms of a Failing MAP Sensor:
While the MAP sensor is a durable component, it can eventually fail due to wear and tear, environmental factors, or electrical issues. Here are some common symptoms indicating a malfunctioning MAP sensor:
- Engine Stalling or Difficulty Starting: An inaccurate MAP reading can disrupt the fuel-air mixture, causing the engine to stall or struggle to start.
- Rough Idling or Hesitation: A faulty MAP sensor can lead to inconsistent fuel delivery, resulting in rough idling or hesitation during acceleration.
- Increased Fuel Consumption: An inaccurate air density reading can lead to a rich fuel mixture, causing increased fuel consumption and reduced fuel efficiency.
- Check Engine Light (CEL): A malfunctioning MAP sensor will often trigger a CEL, accompanied by a diagnostic trouble code (DTC) related to the sensor.
Troubleshooting and Replacing the MAP Sensor:
If you suspect a faulty MAP sensor, it is crucial to have it diagnosed and potentially replaced by a qualified mechanic.
Troubleshooting Steps:
- Check for DTCs: Use an OBD-II scanner to retrieve any stored DTCs related to the MAP sensor.
- Inspect the MAP Sensor: Visually inspect the MAP sensor for signs of damage, corrosion, or loose connections.
- Check for Vacuum Leaks: Inspect the intake manifold and associated hoses for any leaks that could affect the pressure readings.
- Perform a MAP Sensor Test: Some diagnostic tools allow you to test the MAP sensor’s output voltage and compare it to the manufacturer’s specifications.
Replacing the MAP Sensor:
If the diagnosis confirms a faulty MAP sensor, it needs to be replaced. The process typically involves:
- Disconnecting the Battery: Disconnect the negative terminal of the battery to prevent electrical shocks.
- Locating the MAP Sensor: Identify the MAP sensor, usually found on the intake manifold.
- Disconnecting the Electrical Connector: Unplug the electrical connector from the sensor.
- Removing the Sensor: Remove the MAP sensor from its mounting location.
- Installing the New Sensor: Install the new MAP sensor in the same location, ensuring the electrical connector is securely connected.
- Reconnecting the Battery: Reconnect the battery terminal and clear any stored DTCs.
Frequently Asked Questions (FAQs) about the 1998 Honda Civic MAP Sensor:
Q: How often should the MAP sensor be replaced?
A: The MAP sensor is generally a durable component, but it can wear out over time. It is recommended to have it inspected during regular maintenance intervals, and replace it if necessary.
Q: Can I replace the MAP sensor myself?
A: While replacing the MAP sensor is a relatively straightforward task, it requires some mechanical knowledge and basic tools. If you are not comfortable working on your vehicle, it is recommended to seek professional assistance.
Q: What are the potential consequences of ignoring a faulty MAP sensor?
A: Ignoring a faulty MAP sensor can lead to various issues, including reduced fuel efficiency, engine misfires, rough idling, and even engine damage. It is crucial to address any issues related to the MAP sensor promptly.
Tips for Maintaining the MAP Sensor:
- Regular Maintenance: Ensure regular maintenance schedules are adhered to, including oil changes and air filter replacements, as these can indirectly affect the MAP sensor’s performance.
- Inspect for Leaks: Regularly inspect the intake manifold and associated hoses for any leaks that could compromise the pressure readings.
- Avoid Harsh Environments: Minimize exposure to extreme temperatures, moisture, and dirt, as these can damage the sensor.
Conclusion:
The MAP sensor, while often overlooked, plays a vital role in ensuring optimal engine performance and fuel efficiency in the 1998 Honda Civic. Understanding its function, common symptoms of failure, and troubleshooting steps can help you address any issues promptly and maintain the reliability and performance of your vehicle. Remember that a properly functioning MAP sensor contributes significantly to the overall health and longevity of your engine.


Closure
Thus, we hope this article has provided valuable insights into The Unsung Hero: Understanding the 1998 Honda Civic’s Manifold Absolute Pressure Sensor. We hope you find this article informative and beneficial. See you in our next article!